NetConnect Developer Guide
Setting up, getting started
Refer to the guide Setting up and getting started.
Design
Architecture
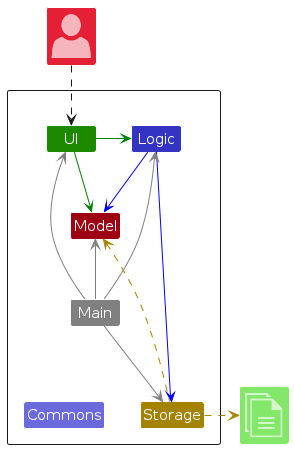
The Architecture Diagram given above explains the high-level design of the App.
Given below is a quick overview of main components and how they interact with each other.
Main components of the architecture
Main (consisting of classes Main and MainApp) is in charge of the app launch and shut down.
- At app launch, it initializes the other components in the correct sequence, and connects them up with each other.
- At shut down, it shuts down the other components and invokes cleanup methods where necessary.
The bulk of the app's work is done by the following four components:
UI: The UI of the App.Logic: The command executor.Model: Holds the data of the App in memory.Storage: Reads data from, and writes data to, the hard disk.
Commons represents a collection of classes used by multiple other components.
How the architecture components interact with each other
The Sequence Diagram below shows how the components interact with each other for the scenario where the user issues the command delete i/1.

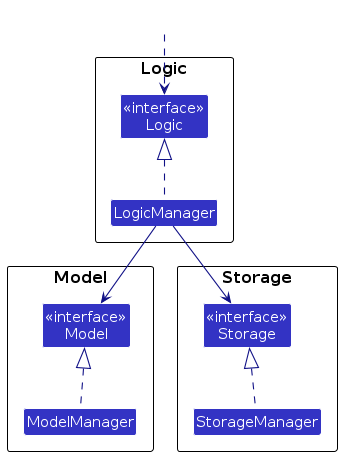
Each of the four main components (also shown in the diagram above),
- defines its API in an
interfacewith the same name as the Component. - implements its functionality using a concrete
{Component Name}Managerclass (which follows the corresponding APIinterfacementioned in the previous point.
For example, the Logic component defines its API in the Logic.java interface and implements its functionality using the LogicManager.java class which follows the Logic interface. Other components interact with a given component through its interface rather than the concrete class (reason: to prevent outside component's being coupled to the implementation of a component), as illustrated in the (partial) class diagram below.
The sections below give more details of each component.
UI component
The API of this component is specified in Ui.java
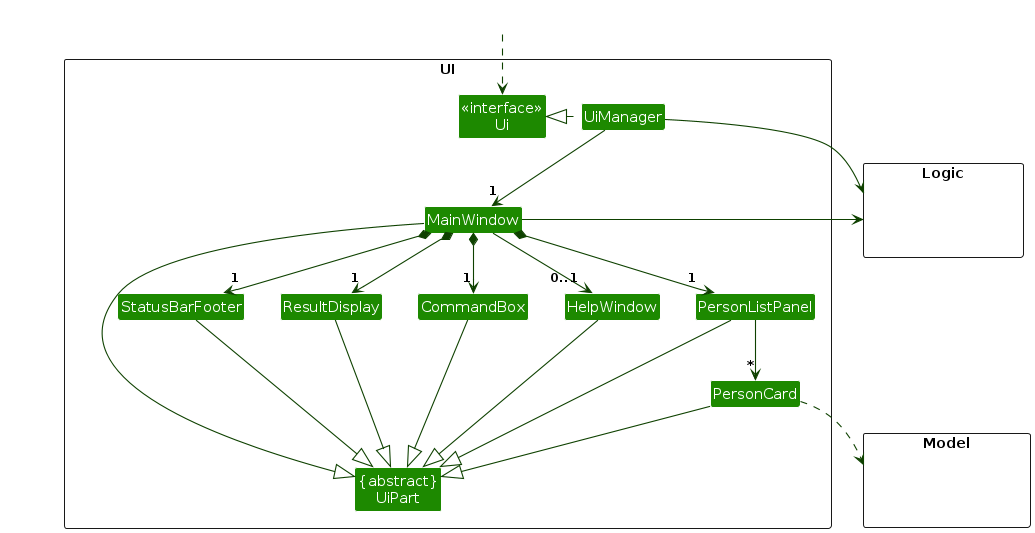
The UI consists of a MainWindow that is made up of parts e.g.CommandBox, ResultDisplay, PersonListPanel, StatusBarFooter etc. All these, including the MainWindow, inherit from the abstract UiPart class which captures the commonalities between classes that represent parts of the visible GUI.
The UI component uses the JavaFx UI framework. The layout of these UI parts are defined in matching .fxml files that are in the src/main/resources/view folder. For example, the layout of the MainWindow is specified in MainWindow.fxml
The UI component,
- executes user commands using the
Logiccomponent. - listens for changes to
Modeldata so that the UI can be updated with the modified data. - keeps a reference to the
Logiccomponent, because theUIrelies on theLogicto execute commands. - depends on some classes in the
Modelcomponent, as it displaysPersonobject residing in theModel.
Logic component
API : Logic.java
Here's a (partial) class diagram of the Logic component:
The sequence diagram below illustrates the interactions within the Logic component, taking execute("delete i/1") API call as an example.
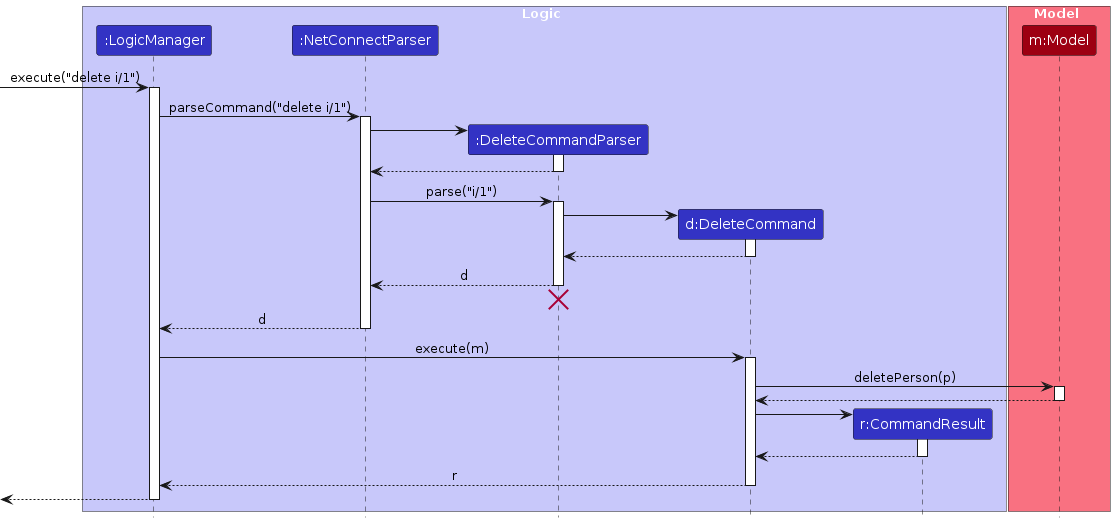
Note: The lifeline for DeleteCommandParser should end at the destroy marker (X) but due to a limitation of PlantUML, the lifeline continues till the end of diagram.
How the Logic component works:
- When
Logicis called upon to execute a command, it is passed to anNetConnectParserobject which in turn creates a parser that matches the command (e.g.,DeleteCommandParser) and uses it to parse the command. - This results in a
Commandobject (more precisely, an object of one of its subclasses e.g.,DeleteCommand) which is executed by theLogicManager. - The command can communicate with the
Modelwhen it is executed (e.g. to delete a person).
Note that although this is shown as a single step in the diagram above (for simplicity), in the code it can take several interactions (between the command object and theModel) to achieve. - The result of the command execution is encapsulated as a
CommandResultobject which is returned back fromLogic.
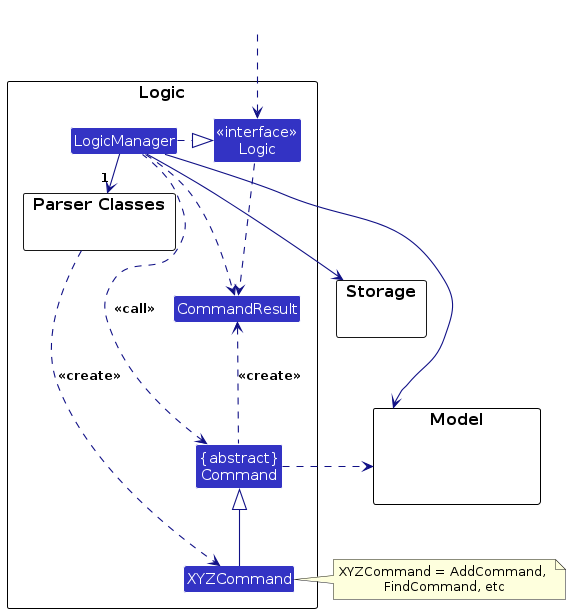
Here are the other classes in Logic (omitted from the class diagram above) that are used for parsing a user command:
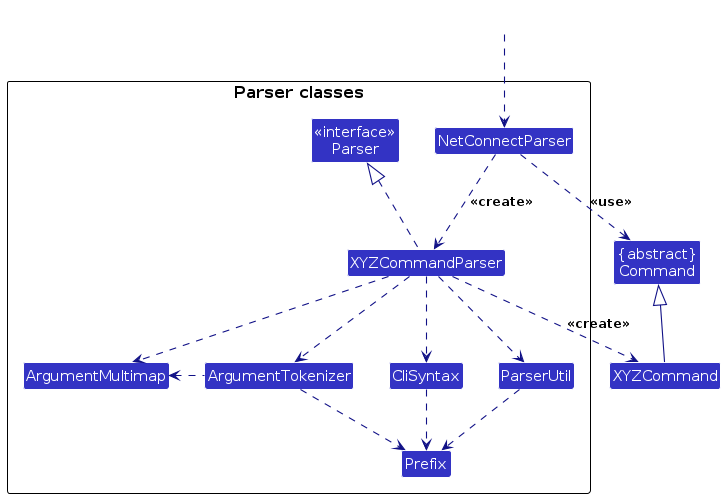
How the parsing works:
- When called upon to parse a user command, the
NetConnectParserclass creates anXYZCommandParser(XYZis a placeholder for the specific command name e.g.,AddCommandParser) which uses the other classes shown above to parse the user command and create aXYZCommandobject (e.g.,AddCommand) which theNetConnectParserreturns back as aCommandobject. - All
XYZCommandParserclasses (e.g.,AddCommandParser,DeleteCommandParser, ...) inherit from theParserinterface so that they can be treated similarly where possible e.g, during testing.
Model component
API : Model.java
Here's a (partial) class diagram of the Model component:
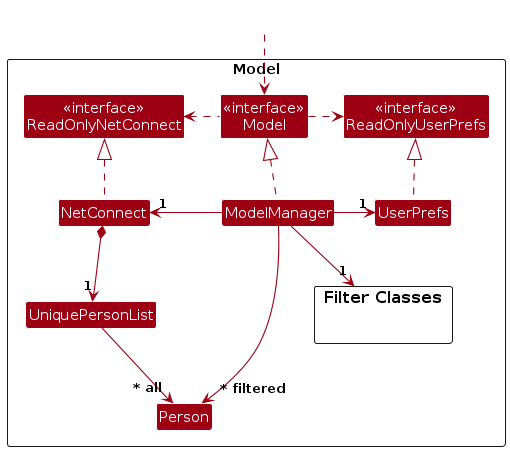
The Model component,
- stores the netconnect data i.e., all
Personobjects (which are contained in aUniquePersonListobject). - stores the currently 'selected'
Personobjects (e.g., results of a search query) as a separate filtered list which is exposed to outsiders as an unmodifiableObservableList<Person>that can be 'observed' e.g. the UI can be bound to this list so that the UI automatically updates when the data in the list change. This filtered list is further filtered by the Filter classes. - stores a
UserPrefobject that represents the user’s preferences. This is exposed to the outside as aReadOnlyUserPrefobjects. - does not depend on any of the other three components (as the
Modelrepresents data entities of the domain, they should make sense on their own without depending on other components)
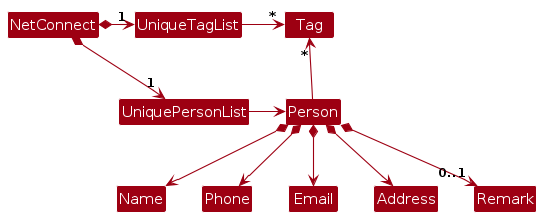
Note: An alternative (arguably, a more OOP) model is given below. It has a Tag list in the NetConnect, which Person references. This allows NetConnect to only require one Tag object per unique tag, instead of each Person needing their own Tag objects.
Here are the other classes in Model (omitted from the class diagram above) that are used for filtering the list that is displayed to users:
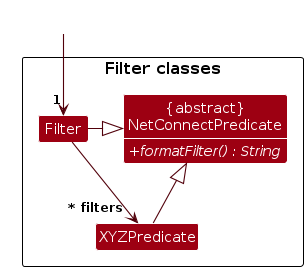
How the filtering works:
ModelManagerstores only one instance ofFilterat any one time. The storedFilterinstance in turn stores all theXYZPredicateobjects currently applied to the filtered view.FilteredList#setPredicate(...)is called with theFilterinstance, and only shows allPersonobjects that satisfy all predicates inFilter.
Storage component
API : Storage.java
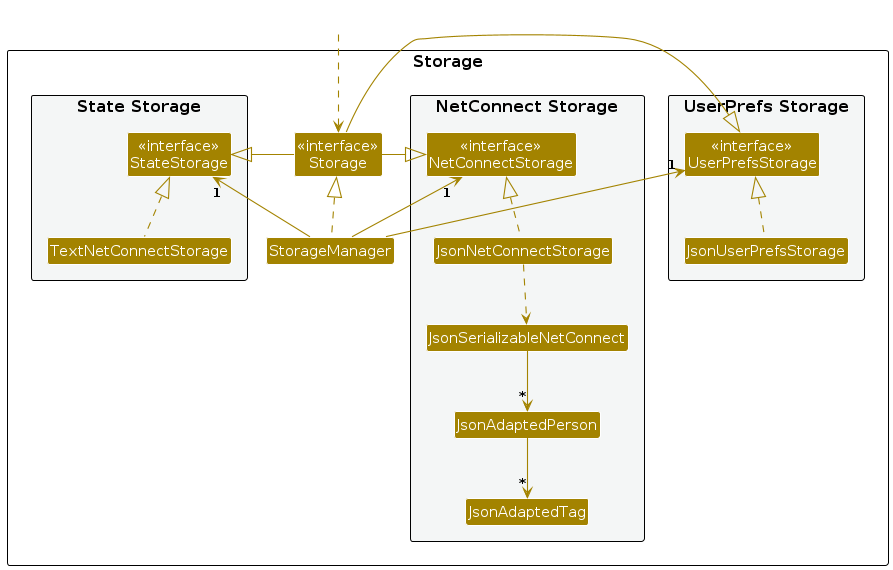
The Storage component,
- can save both netconnect data and user preference data in JSON format, and read them back into corresponding objects.
- it can also save the state of the command box in a file called
state.txtin the data folder. - inherits from both
NetConnectStorage,UserPrefStorageas well asStateStorage, which means it can be treated as either one (if only the functionality of only one is needed). - depends on some classes in the
Modelcomponent (because theStoragecomponent's job is to save/retrieve objects that belong to theModel)
Common classes
Classes used by multiple components are in the seedu.netconnect.commons package.
Implementation
This section describes some noteworthy details on how certain features are implemented.
Export Feature
Expected Behaviour
The export command allows users to export contact data from NetConnect into a CSV file. Users have the option to specify a file name. If no file path is provided, the CSV file is saved as a default name. The command exhibits the following exceptional behaviors:
- If the file name provided is invalid or inaccessible, an error message is displayed to the user.
The successful execution of the export command results in the creation of a CSV file as the specified or default name at default location, containing all the contact data available in NetConnect.
Current Implementation
A ExportCommand instance is created in the ExportCommandParser#parse(...) method when the user issues the export command. The process involves the following steps:
- Parsing the command input to extract the file nqm3 if provided.
- If no filename is provided, setting the filename to a default value.
- Utilizing the
CsvExportercomponent to write the data to the CSV file.
The sequence diagram below illustrates the execution of a ExportCommand:
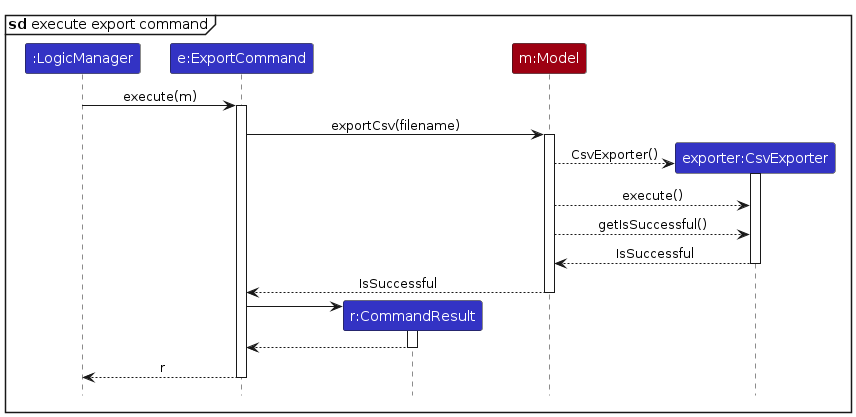
The sequence diagram below illustrates the creation and execution of a CsvExporter:
Design Considerations
Aspect: Handling of file paths in the export command:
- Alternative 1 (Current Choice): Always save the CSV file to a fixed, pre-defined location without user input.
- Pros: Simplifies the command's implementation by removing the need to parse and validate user-provided file paths.
- Cons: Reduces user flexibility in determining where the CSV file should be saved.
- Alternative 2: Allow users to specify a file path, defaulting to a pre-defined location if not specified.
- Pros: Provides flexibility for users to save the CSV file wherever they prefer.
- Cons: Additional error handling is required to manage invalid or inaccessible file paths.
Person Roles Feature
Overview
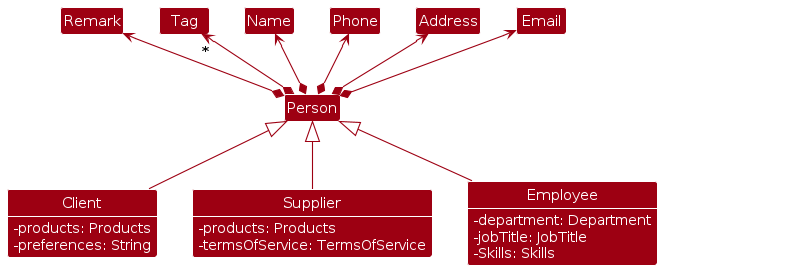
The person can be categorized into three roles: Client, Supplier, and Employee. These classes extend the base Person class and encapsulate various role-specific functionalities and attributes, improving the application's ability to cater to a diverse range of user interactions.
- Client: Represents a customer, associated with products and preferences.
- Supplier: Represents a vendor, associated with products and terms of service.
- Employee: Represents an employee, associated with a department, job title, and skills.
Expected Behaviour
The Person class is extended by three other classes, each with their own additional attributes:
ClientSubclass containsproductsattribute of typeProducts, representing the products associated with the client, and containspreferencesas aString, detailing client-specific preferences.SupplierSubclass containsproductsattribute of typeProducts, which lists the items supplied, and holdstermsOfServiceof typeTermsOfService, outlining the agreement with the supplier.EmployeeSubclass includes adepartmentattribute of typeDepartment, signifying the department the employee belongs to, has ajobTitleattribute of typeJobTitle, representing the employee's official title, and featuresskillsof typeSkills, indicating the competencies of the employee.
Implementation
Class Additions
Client,Supplier, andEmployeeclasses have been added, extending thePersonclass to include role-specific fields.- New classes
Department,JobTitle,Products,Skills, andTermsOfServiceare introduced to encapsulate relevant attributes.
Data Storage
- The
JsonAdaptedPersonclass has been implemented to support the conversion to and from the new role-based classes, ensuring compatibility with the enhanced JSON schema.
User Interface Enhancements
- The UI has been enhanced to dynamically display optional fields based on the person's role, offering a tailored user experience.
Command and Parser Modifications
- Commands and parsers have been updated to recognize and process additional arguments related to the new person types.
- Modified commands handle logic specific to each role, ensuring correct operation based on person type.
Usage Scenario
- An administrator decides to add a new
Employeeto the system. - The administrator inputs the employee's details, including department, job title, and skills.
- The system processes the input, updates the data storage, and the UI reflects the new employee's information, displaying department and job title.
Design Considerations
Aspect: How to distinguish the person role:
Alternative 1 (current choice): Creation of subclasses
Supplier,Employee, andClientthat inherit from thePersonclass.- Pros:
- Specialization: Allows for clear role-specific methods and properties, ensuring that objects have only the attributes and behaviors pertinent to their role.
- Extensibility: Easier to add new roles by creating additional subclasses.
- Polymorphism: Enables the use of a single interface to represent any person type, which simplifies code that interacts with these objects.
- Cons:
- Complexity: More complex class hierarchy which can become difficult to manage with a large number of roles.
- Redundancy: Potential for redundant code in subclasses if there is significant overlap in behavior or data.
- Rigid Hierarchy: Changing the class hierarchy can be challenging if the differentiation between roles changes over time.
- Pros:
Alternative 2: Introducing a
typefield within thePersonclass to indicate the person's role and including all possible fields for all types.- Pros:
- Simplicity: A flat structure with a single
Personclass could simplify the system. - Flexibility: Easy to change a person’s role by updating the type field without the need to instantiate a new object.
- Single Table Storage: All person records can be stored in a single database table, which can simplify CRUD operations.
- Simplicity: A flat structure with a single
- Cons:
- Data Sparseness: The
Personobject will have redundant fields that are not applicable to all types, leading to wasted storage space and potential confusion. - Increased Conditionals: The code will require conditional logic to handle behavior specific to each role, which can make the code more complex and harder to maintain.
- Loss of Type Safety: Without distinct classes, it's easier to mistakenly assign the wrong attributes or behaviors to a person object.
- Data Sparseness: The
- Pros:
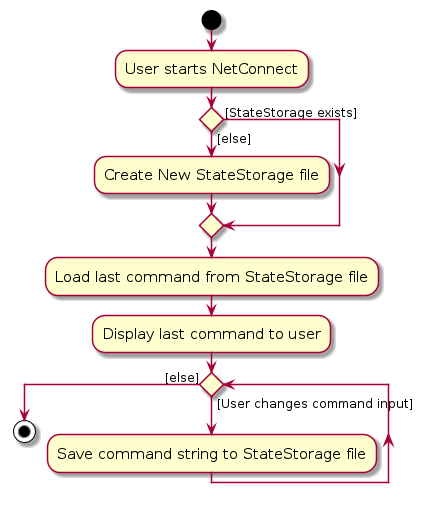
Save state feature
The save state feature is implemented using the TextStateStorage which implements StateStorage interface. It is responsible for saving the state of the command box. The state is saved in a file called state.txt in the data folder. The state is updated at each change in the input. Additionally, it implements the following operations:
TextStateStorage#saveState(String state)— Saves the current state of the command box into file.TextStateStorage#readState()— Reads the saved state of the command box from the file and returns the string.TextStateStorage#clearState()— Clears the file storing the states.TextStateStorage#isStateStorageExists()— Checks if the file storing the states exists.TextStateStorage#deleteStateStorage()— Deletes the file storing the states.TextStateStorage#getStateStorageFilePath()— Returns the file path of the file storing the states.TextStateStorage#getFilePathString()— Returns the file path of the file storing the states as a string.TextStateStorage#getDirectoryPath()— Returns the directory path of the file storing the states.
Given below is an example usage scenario and how the save state feature behaves at each step.
Step 1. The user launches the application. During set up, the presence of the state storage file is checked. If absent, a new storage file is created. When the command box is instantiated, it calls the TextStateStorage#readState() method to get the last command that was present in the command box before it was last closed. The text in the file is retrieved and loaded into the command box using TextField#setText.
Note: If the storage file is not found a new empty file is created.
Step 2. The user changes the input in the command box. The TextStateStorage#saveState(String state) method is called to save the current state of the command box into the file.
Design considerations:
Aspect: How save state executes:
Alternative 1 (current choice): Update the storage file at every change in input.
- Pros: Lower risk of data loss.
- Cons: Constantly updating the storage file with every change in input may introduce performance overhead.
Alternative 2: Update the storage file only when the application is closed.
- Pros: Reduces the number of writes to the storage file, reducing performance overhead.
- Cons: Does not save the state of the command box in case of a crash.
Alternative 3: Update the storage file when there is a pause in typing.
- Pros: Reduces the number of writes to the storage file, reducing performance overhead.
- Cons: May not save the state of the command box in case of a crash.
Relate feature
Expected behaviour
The relate command allows users to relate two persons via their unique ID. Exceptional behavior:
- If the
IDprovided by user does not exist, an error message is displayed. - If the
IDprovided is not an integer value that is more than 0, an error message is displayed.
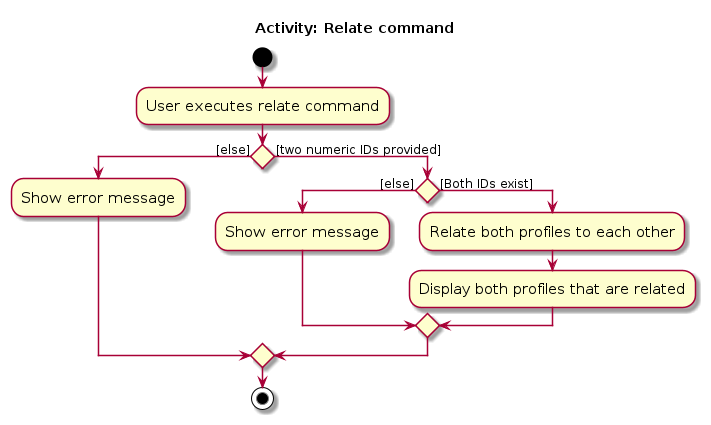
Current implementation
Given a command relate i/1 i/2, the NetConnectParser recognises the relate command and first instantiates a RelateCommandParser object. It then passes the command string into RelateCommandParser#parse(...), where the input i/1 and i/2 is validated for its format. Following which, RelateCommandParser instantiates a RelateCommand object.
TheRelateCommand object extends the Command interface, and hence contains a method called execute(...), which takes in a model. A model can be thought of as a container for the application's data, and it also controls the exact contact list that the user will see. In the execute(...) command, we validate that NetConnect has both IDs 1 and 2 and, does not already have a relation. We add it to our RelatedList storage if both are true. To change our view and to ratify the successful command, we will have to change the view the user sees by instantiating a predicate called IdContainsDigitsPredicate. We will then pass it into the model#stackFilters(predicate) method in the model object to update the filtered list of persons to only include the two people with ID 1 and 2.
Recalling that we also have a message box to inform the result of the actions taken (in prose form), the RelateCommand#execute(...) method will also return a CommandResult object, which contains the summary of the number of people listed.
Design considerations
Aspect: How to store relations between contacts
Alternative 1 (current choice): Store the Related List within the NetConnect model as a JSON file. Each time a relate command is done, we will just have to save the NetConnect model.
- Pros: This approach requires a single command for saving and loading and does not violate encapsulation of classes. Saving and loading does not have to be exposed to wider classes and done within the NetConnect model interface.
- Cons: JSON files can be difficult to amend and maintain.
Alternative 2 (previously implemented): Store the Related List as a .txt file.
- Pros: Easier to edit, and implement.
- Cons: Harder to maintain as there will be multiple files to be used by our application. Save and load implementation is also exposed outside the NetConnect model.
Alternative 3: Store Relations as another field in every person. A relate command would add the opposing contact to both persons provided.
- Pros: Easy to understand as a user. Querying of contacts will also be fast as the relations are stored within the same contact.
- Cons: Unnecessary to user, and complicates UI. Also has a higher potential for bugs given that the entire contact list has to be searched and updated each time a relation is added and subsequently removed.
ShowRelated feature
Expected behaviour
The showrelated command allows users to view all persons related to a specific person via their unique ID. Exceptional behavior:
- If there are multiple
IDprovided by user, an error message is displayed. - If the
IDprovided is not an integer value that is more than 0, an error message is displayed.

Current implementation
Given a command showrelated i/1, the NetConnectParser recognises the showrelated command and first instantiates a ShowRelatedCommandParser object. It then passes the command string into ShowRelatedCommandParser#parse(...), where the input i/1 is validated for its format. Following which, ShowRelatedCommandParser instantiates a ShowRelatedCommand object.
TheShowRelatedCommand object extends the Command interface, and hence contains a method called execute(...), which takes in a model. A model can be thought of as a container for the application's data, and it also controls the exact contact list that the user will see. In the execute(...) command, we extract all the tuples that contain ID 1 and use it to instantiate a predicate called IdContainsDigitsPredicate which extracts all the ID of the related profiles (excluding itself of ID 1). We will then pass it into the model#stackFilters(predicate) method in the model object to update the filtered list of persons to only include persons related to the person with ID of 1.
Recalling that we also have a message box to inform the result of the actions taken (in prose form), the ShowRelatedCommand#execute(...) method will also return a CommandResult object, which contains the summary of the number of people listed.
Design considerations
Aspect: How to extract the IDs of the related profiles
Alternative 1 (current choice): Extract all the tuples from storage and use regular expressions to check if either of the
IDin the tuple is the specifiedID, then extract theIDof the other related profile.- Pros: This approach is straightforward and uses existing methods to extract the related profiles.
- Cons: Regular expressions can be difficult to understand and maintain.
Alternative 2: Extract only tuples that contain the specified
ID, then extract theIDof the other related profile.- Pros: Smaller chunk of data is extracted, reducing the amount of data to be processed as data is filtered out during read from storage.
- Cons: More complex implementation as the data is filtered out during read from storage, requiring filtering with String data instead of as IdTuple.
Unrelate feature
Expected behaviour
The unrelate command allows users to unrelate two persons via their unique ID. Exceptional behavior:
- If the
IDprovided by user does not exist, an error message is displayed. - If the
IDprovided is not an integer value that is more than 0, an error message is displayed.
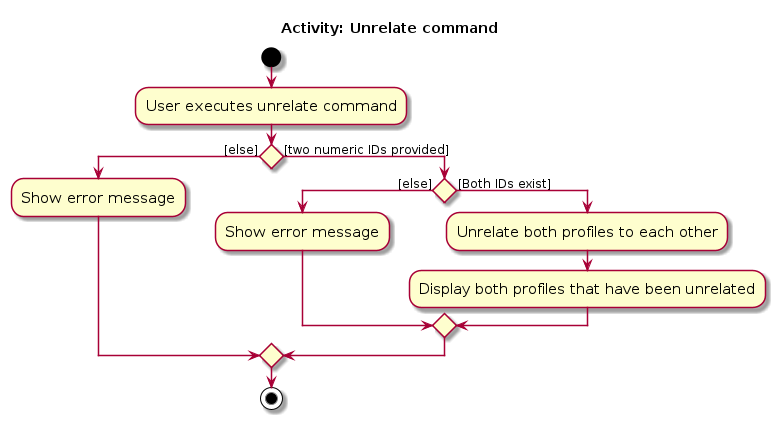
Current implementation
Given a command unrelate i/1 i/2, the NetConnectParser recognises the unrelate command and first instantiates an UnrelateCommandParser object. It then passes the command string into UnrelateCommandParser#parse(...), where the input i/1 and i/2 is validated for its format. Following which, UnrelateCommandParser instantiates an UnrelateCommand object.
TheUnrelateCommand object extends the Command interface, and hence contains a method called execute(...), which takes in a model. A model can be thought of as a container for the application's data, and it also controls the exact contact list that the user will see. In the execute(...) command, we validate that NetConnect has both IDs 1 and 2 and already has a relation. We remove it from our RelatedList stored in NetConnect if both are true. To change our view and to ratify the successful user command, we will have to change the view the user sees by instantiating a predicate called IdContainsDigitsPredicate. We will then pass it into the model#stackFilters(predicate) method in the model object to update the filtered list of persons to only show the two people who have just been unrelated with the ID 1 and 2.
Recalling that we also have a message box to inform the result of the actions taken (in prose form), the UnrelateCommand#execute(...) method will also return a CommandResult object, which contains the id of the two people, in a 1relates2 format..
Design considerations
Aspect: What kind of unrelation will be done using the two IDs
Alternative 1 (current choice): The two IDs given will be used to remove that specific relation.
- Pros: This approach would allow the user the greatest flexibility in removing relations between contacts.
- Cons: User may think that it would delete all relations from each contact.
Alternative 2: The two IDs given will be used to remove all relations for the two contacts.
- Pros: Can help with resetting of all relations for the contact quickly.
- Cons: Since the showrelated feature can show the user which relations for the contact already exists, manual and more precise unrelation has more value. This multi-field input for unrelate may confuse users based on the existing relate command usage.
Delete feature
Expected behaviour
The delete command allows users to delete Person from NetConnect using either the target Person's Id or Name. Id allows users to directly and accurately delete the Person if the Id is known, while Name provides the flexibility to delete using name if Id is not known. Exceptional behaviour:
- If both
IdandNameis provided, an error message is shown. - If there are no
Persons with the givenNameorId, the display is updated to show allPersons, and an error message is shown.
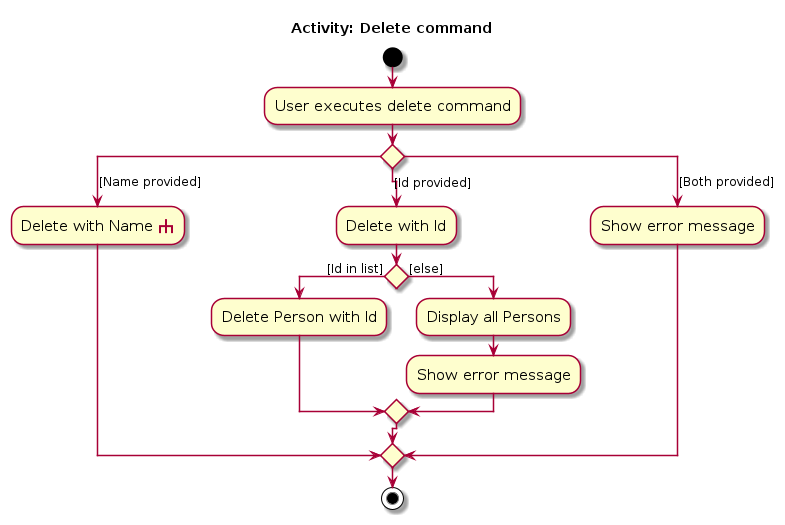
- If
Nameis provided but there are more than onePersonwith the specifiedNamein NetConnect, allPersons with the matchingNamewill be displayed, and user will be prompted to re-input thedeletecommand usingIdinstead.
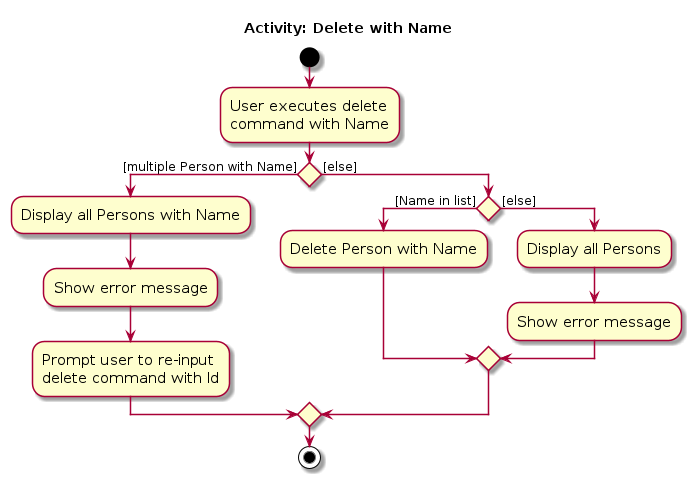
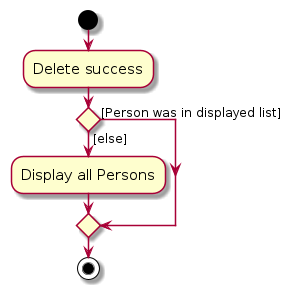
delete can be done regardless of whether the target Person is in the current displayed list. If the Person is in the current displayed list, the display view does not change upon successful delete. If the Person is in not in the current displayed list, the display view is changed to display all Persons upon successful delete.
Current implementation
A DeleteCommand instance is instantiated in DeleteCommandParser#parse(...) by the factory methods DeleteCommand#byId(Id) or DeleteComamnd#byName(Name). The sequence diagram below shows the creation of a DeleteCommand with Id. The process is similar for DeleteCommand with Name.
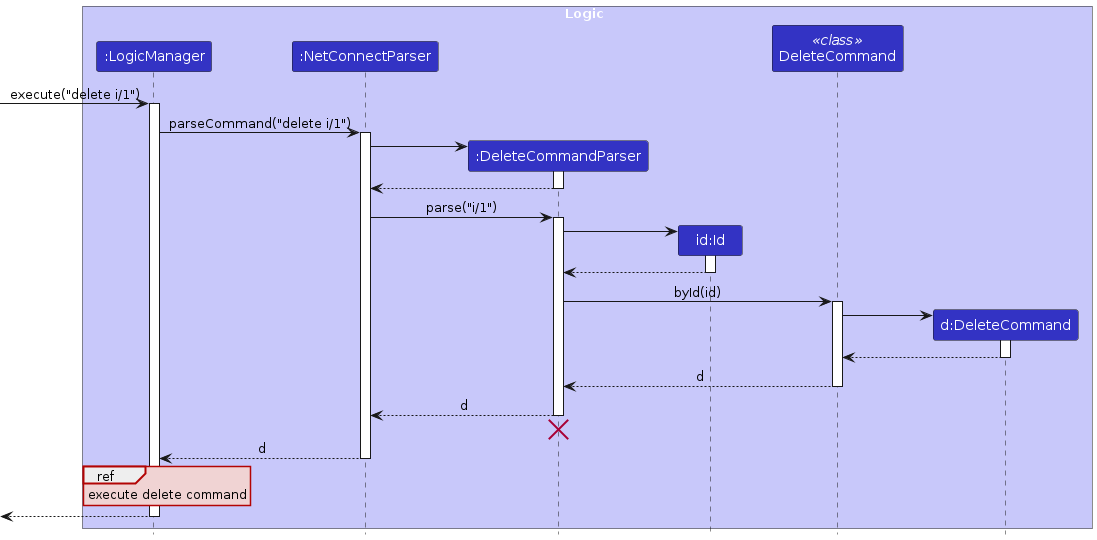
Note: The lifeline for DeleteCommandParser should end at the destroy marker (X) but due to a limitation of PlantUML, the lifeline continues till the end of diagram.
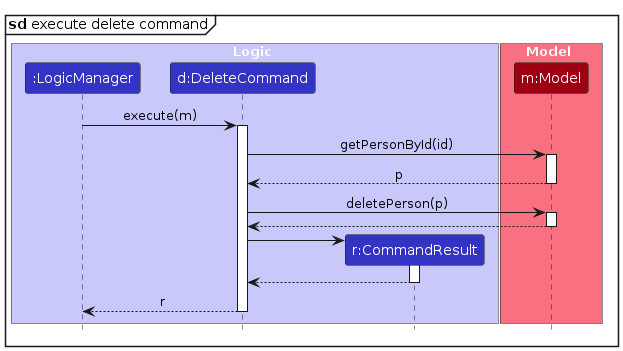
Deletion of Person from NetConnect is facilitated by Model#getPersonById(Id) or Model#getPersonByName(Name), and Model#deletePerson(Person)). The sequence diagram below shows the execution of a DeleteCommand with Id. The process is similar for DeleteCommand with Name.
Design considerations
Aspect: How delete command executes:
Alternative 1 (current choice): A single
Model#deletePerson(Person)method.- Pros:
- Implementation of
Model#getPersonById(Id)andModel#getPersonByName(Name)can be reused for other purposes. - Simple implementation of
Model#deletePerson(Person).
- Implementation of
- Cons: Need to ensure
Personwith matchingIdorNameexists in the list beforeModel#getPersonById(Id),Model#getPersonByName(Name)andModel#deletePerson(Person)are called.
- Pros:
Alternative 2: Separate methods of
Model#deletePersonById(Id)andModel#deletePersonByName(Name).- Pros: Simple implementation of
DeleteCommand#execute(...). - Cons:
- Presence checks required in
Model#deletePersonById(Id)andModel#deletePersonByName(Name). - More boilerplate code since
Model#deletePersonById(Id)andModel#deletePersonByName(Name)are very similar.
- Presence checks required in
- Pros: Simple implementation of
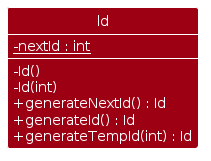
Unique Id of Person
The unique id of Person is stored as a private field Id instance in Person. Id value is enforced to be unique between each Person by keeping the constructors of the Id class private, and by using a private static field nextId. The Id class provides 3 factory methods to instantiate Id:
Id#generateNextId()— instantiates anIdobject with the next available value given bynextId.Id#generateId(int)— instantiates anIdobject with the given value, and updates nextId to be the given value + 1. This method is necessary to updatenextIdwhile keeping theIdvalue of eachPersonthe same between different runs of the application.Id#generateTempId(int)— instantiates anIdobject with the given value, without changing the value ofnextId. This method is used for non-addNetConnect commands that accepts id as an argument. This method is necessary as usingId#generateId(int)in non-addcommands will causenextIdto be updated, even if there are no persons in the NetConnect using the previousId. Example:- NetConnect has persons with
Id1 to 5. - User inputs
delete i/1000command, whereId#generateId(int)is used. nextIdis updated to be 1001.- On the next
Id#generateNextId(),Idvalue 1001 will be used although values 6 to 1000 are not used.
- NetConnect has persons with
Operations with Id on Person in NetConnect is facilitated through Model#hasId(Id) and Model#getPersonById(Id).
Find feature
Expected behaviour
The find command allows users to filter the display to show Persons from NetConnect with fields matching certain values. The command allows finding by name, phone number, tag, role, remark. Parameters provided are subjected to its respective validity checks, and mentions of these checks will be omitted in this section.
Current implementation
The execution of find is facilitated by Model#clearFilter() and Model#stackFilters(NetConnectPredicate). Model uses the Filter classes in the Model component to facilitate the implementation. find by each field uses its respective XYZPredicate:
findby name usesNameContainsKeywordsPredicatefindby tag usesTagsContainsKeywordsPredicatefindby phone number usesPhoneMatchesDigitsPredicatefindby role usesRoleMatchesKeywordsPredicatefindby remark usesRemarkContainsKeywordsPredicate
The sequence diagram below shows the parsing of a find n/John command. The process is similar for find command with other parameters.
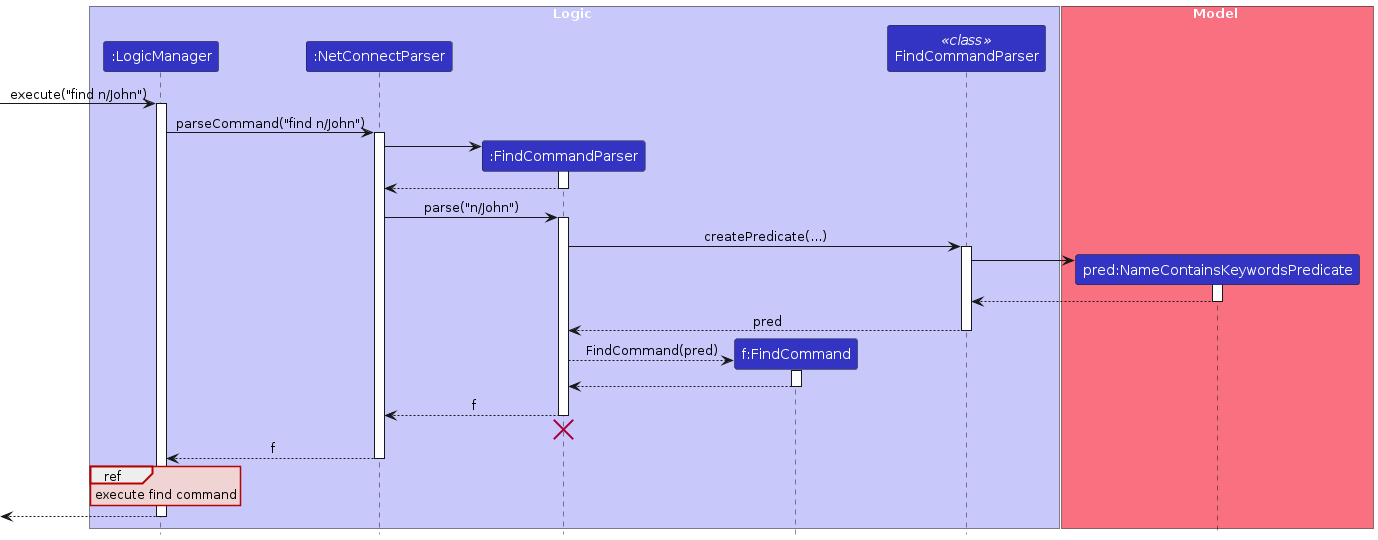
Note: The lifeline for DeleteCommandParser should end at the destroy marker (X) but due to a limitation of PlantUML, the lifeline continues till the end of diagram.
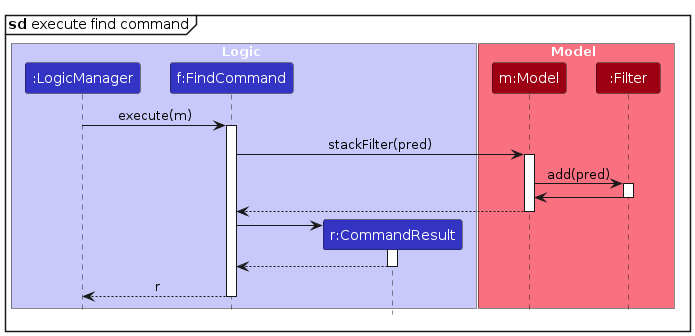
The sequence diagram below shows the execution of the find command created from a find n/John command.
The list command, or any other command that alters the displayed view can be used to clear all existing filters. In these cases, the stored Filter object in ModelManager will be set to a Filter containing no predicates.
Design considerations
Aspect: How the view of the displayed list is filtered
Alternative 1 (current choice): Create a new
Filterclass to store all the predicates.- Pros: Allows retrieval of current predicates, and can be displayed to user.
- Cons: Require an additional private field in
ModelManager.
Alternative 2: Stack the predicates using
FilteredList#setPredicate(...),FilteredList#getPredicate()and `Predicate#and(...), without explicitly storing the predicates.- Pros: Simple implementation without additional classes or fields.
- Cons: Unable to retrieve the current predicates applied and hence unable to display to users the current filters applied.
[Proposed] Undo/redo feature
Proposed Implementation
The proposed undo/redo mechanism is facilitated by VersionedNetConnect. It extends NetConnect with an undo/redo history, stored internally as an netConnectStateList and currentStatePointer. Additionally, it implements the following operations:
VersionedNetConnect#commit()— Saves the current netconnect state in its history.VersionedNetConnect#undo()— Restores the previous netconnect state from its history.VersionedNetConnect#redo()— Restores a previously undone netconnect state from its history.
These operations are exposed in the Model interface as Model#commitNetConnect(), Model#undoNetConnect() and Model#redoNetConnect() respectively.
Given below is an example usage scenario and how the undo/redo mechanism behaves at each step.
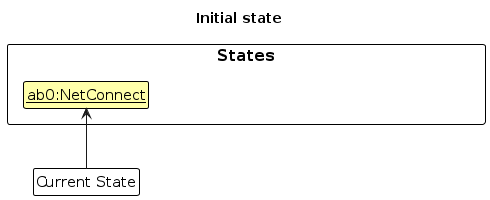
Step 1. The user launches the application for the first time. The VersionedNetConnect will be initialized with the initial netconnect state, and the currentStatePointer pointing to that single netconnect state.
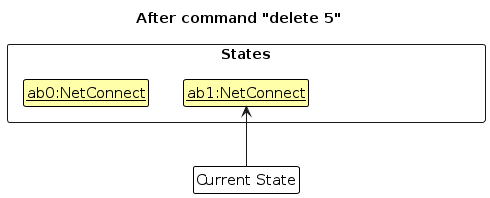
Step 2. The user executes delete 5 command to delete the 5th person in the netconnect. The delete command calls Model#commitNetConnect(), causing the modified state of the netconnect after the delete 5 command executes to be saved in the netConnectStateList, and the currentStatePointer is shifted to the newly inserted netconnect state.
Step 3. The user executes add n/David … to add a new person. The add command also calls Model#commitNetConnect(), causing another modified netconnect state to be saved into the netConnectStateList.
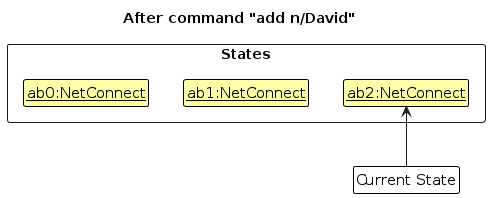
Note: If a command fails its execution, it will not call Model#commitNetConnect(), so the netconnect state will not be saved into the netConnectStateList.
Step 4. The user now decides that adding the person was a mistake, and decides to undo that action by executing the undo command. The undo command will call Model#undoNetConnect(), which will shift the currentStatePointer once to the left, pointing it to the previous netconnect state, and restores the netconnect to that state.
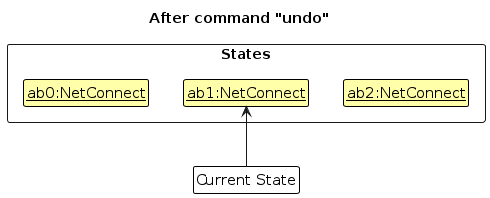
Note: If the currentStatePointer is at index 0, pointing to the initial NetConnect state, then there are no previous NetConnect states to restore. The undo command uses Model#canUndoNetConnect() to check if this is the case. If so, it will return an error to the user rather
than attempting to perform the undo.
The following sequence diagram shows how an undo operation goes through the Logic component:
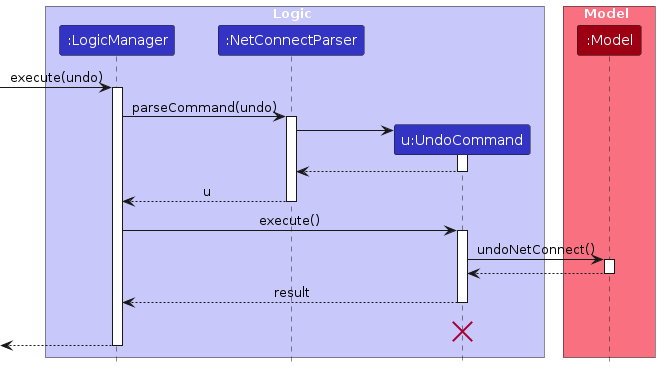
Note: The lifeline for UndoCommand should end at the destroy marker (X) but due to a limitation of PlantUML, the lifeline reaches the end of diagram.
Similarly, how an undo operation goes through the Model component is shown below:
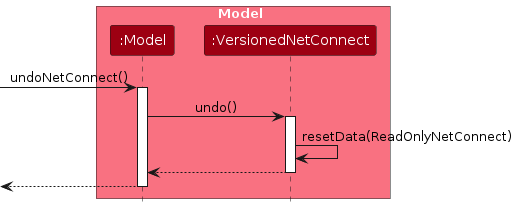
The redo command does the opposite — it calls Model#redoNetConnect(), which shifts the currentStatePointer once to the right, pointing to the previously undone state, and restores the netconnect to that state.
Note: If the currentStatePointer is at index netConnectStateList.size() - 1, pointing to the latest netconnect state, then there are no undone NetConnect states to restore. The redo command uses Model#canRedoNetConnect() to check if this is the case. If so, it will return an error to the user rather than attempting to perform the redo.
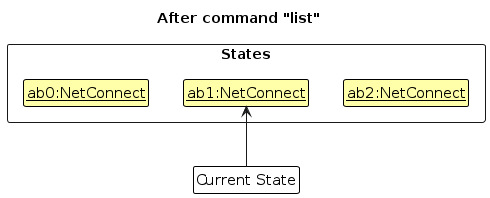
Step 5. The user then decides to execute the command list. Commands that do not modify the netconnect, such as list, will usually not call Model#commitNetConnect(), Model#undoNetConnect() or Model#redoNetConnect(). Thus, the netConnectStateList remains unchanged.
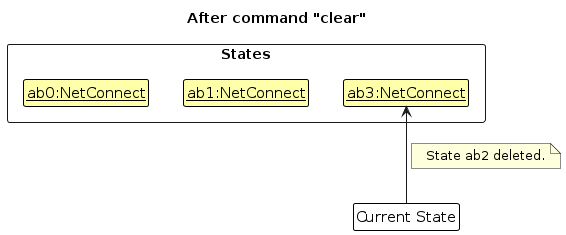
Step 6. The user executes clear, which calls Model#commitNetConnect(). Since the currentStatePointer is not pointing at the end of the netConnectStateList, all netconnect states after the currentStatePointer will be purged. Reason: It no longer makes sense to redo the add n/David … command. This is the behavior that most modern desktop applications follow.
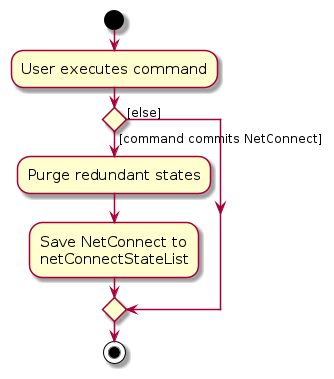
The following activity diagram summarizes what happens when a user executes a new command:
Design considerations
Aspect: How undo & redo executes:
Alternative 1 (current choice): Saves the entire netconnect.
- Pros: Easy to implement.
- Cons: May have performance issues in terms of memory usage.
Alternative 2: Individual command knows how to undo/redo by itself.
- Pros: Will use less memory (e.g. for
delete, just save the person being deleted). - Cons: We must ensure that the implementation of each individual command are correct.
- Pros: Will use less memory (e.g. for
{more aspects and alternatives to be added}
Documentation, logging, testing, configuration, dev-ops
Appendix: Planned Enhancements
Team size: 5
- Make
showrelatedcommand output a specific error message when anIDthat does not exist is provided: Currently, when input isshowrelated i/10but there is noPersonwithID10, the command succeeds and outputs the message "0 persons listed!". This is not the expected result, as the command should fail with an appropriate error message. We plan to handle this erroneous input, and show the error message: "There is no person with id 10" for the above command. - Make
relatecommand success message more specific: The current message for a successfulrelate i/1 i/2command only shows "2 persons listed!", which is too general and might not catch user's typos or mistakes if they wanted to dorelate i/1 i/3 instead. We plan to make the success message output the two persons that are involved in therelatecommand: "The relation between these two persons have been created:Alex Yeoh, Phone: 87438807, Email:alexyeoh@example.comandBernice Yu, Phone: 99272758, Email: berniceyu@example.com". - Fix input validation for
relateandunrelatecommand: Currently, the commandsrelate i/ 1 i/ 2,relate i/1 2 i/3,relate i/1 i/2 tag/friends, orrelate i/a 1 i/2will fail with the following error message: "Invalid command format! ...". This is not consistent with the other commands that ignores additional whitespaces provided to arguments, invalid prefixes provided, or invalid id. We plan to accept values with trailing and leading whitespaces inrelateandunrelatecommand, and output specific error message for invalid prefixes and invalid id. - Enhance UI to wrap long text: Current implementation of NetConnect GUI is only able to accommodate input of approximately 120 characters for the profile fields (name, tags, etc.) in fullscreen mode. Additional text are represented by ellipsis. We plan to enhance the UI to wrap text responsively according to the screen size in the GUI and input length to prevent truncation of text.
- Make
editcommand output a specific error message when the given values of fields are the same as existing ones: Currently, when input isedit i/1 n/AlexbutPersonwithID1 already has the nameAlex, the command succeeds and outputs the message: "Edited Person: ..." although no values were actually changed since the same value is provided. We plan to handle this case where same values are given, making the command fail and show the error message: "There are no changes to values provided". - Add soft delete and data recovery feature: Currently, our id is used in a strictly increasing order, i.e. after deletion of person with
ID6, there will be no other persons allowed to haveID6 in the same run of the app. The rationale for this implementation is to facilitate the feature of soft delete and data recovery. Soft delete means that we will not completely remove the deletedPersonand the details from NetConnect, but only mark it as deleted and not display it or use in any other commands. Soft delete will facilitate the data recovery feature, for user to recover the details of a deletedPersonin the event of accidental deletion. - Make
unrelatecommand success message more user-friendly: The current success message for the commandunrelate i/1 i/2shows "Unrelated the following persons: 1relates2", which is not very user friendly. We plan to change the command success message to show: "Unrelated the following persons:Alex Yeoh, Phone: 87438807, Email:alexyeoh@example.comandBernice Yu, Phone: 99272758, Email: berniceyu@example.com"
Appendix: Requirements
Product scope
Target user profile:
Experienced managers who:
- oversees contact relations with suppliers, customers and employees
- has to manage a significant number of contacts
- works independently in a supervisory role
- has average IT skills
- prefer desktop apps over other types
- can type fast
- prefers typing to mouse interactions
- is reasonably comfortable using CLI apps
Value proposition: provides managers a platform to manage employee, client and partner contact information easily, and to keep track of past interactions.
User stories
Priorities: High (must have) - * * *, Medium (nice to have) - * *, Low (unlikely to have) - *
| Priority | As a … | I want to … | So that I can… |
|---|---|---|---|
* * * | occasional user | add a new person | |
* * * | occasional user | delete a person | remove entries that I no longer need |
* * * | occasional user | find a person by name | quickly access their contact details |
* * * | occasional user | find a person by contact number | see who contacted me |
* * * | occasional user | find a person by remark | view all people with a particular remark |
* * * | occasional user | find a person by role | view all roles separately |
* * * | occasional user | tag roles to members | see distinctions and manage using roles |
* * | occasional user | go back to the state from where i left off | avoid going back to the same page/state when I close the application |
* * | occasional user | edit person information | refer to accurate personal information in the future |
* * | experienced user | export contact lists to a CSV file | create backups or use the data in other applications |
* * | experienced user | relate two profiles together | connect two contacts together |
* * | experienced user | view which contacts are related to a profile | assign tasks to my employees |
* * | experienced user | unrelate two profiles | disconnect two contacts |
* * | new user | see usage instructions | refer to instructions when I forget how to use the App |
* * | new user | clear all existing contacts | populate with my actual contacts |
Use cases
(For all use cases below, the System is the NetConnect and the Actor is the user, unless specified otherwise)
Use case: UC01 - List All Persons
MSS
User requests to list all persons.
NetConnect shows the list of all persons.
Use case ends.
Extensions
2a. The list of all persons is empty.
Use case ends.
Use case: UC02 - Find a List of Persons by Name
MSS
User requests for the list of persons matching a name.
NetConnect shows a list of persons with matching name.
Use case ends.
Extensions
2a. There are no persons with a matching name.
Use case ends.
Use case: UC03 - Find a Specific Person by Contact Number
MSS
User requests for the person with the matching contact number.
NetConnect shows the person with matching contact number.
Use case ends.
Extensions
2a. There is no person with a matching number.
Use case ends.
Use case: UC04 - Find a Specific Person by Role
MSS
User requests for the person with the matching role.
NetConnect shows the person with matching role.
Use case ends.
Extensions
2a. There is no person with a matching role.
Use case ends.
Use case: UC05 - Find a Specific Person by Remark
MSS
User requests for the person with the matching remark.
NetConnect shows the person with matching remark.
Use case ends.
Extensions
2a. There is no person with a matching number.
Use case ends.
Use case: UC06 - Add a New Person
MSS
User requests to add a new person with given information.
NetConnect adds a new person to the list.
Use case ends.
Extensions
1a. Some given arguments are invalid.
1a1. NetConnect shows an error message.
Use case ends.
Use case: UC07 - Delete a Person by UID
MSS
User requests to delete a specific person by UID.
NetConnect deletes the person.
Use case ends.
Extensions
1a. There is no person with the provided UID.
1a1. NetConnect shows an error message.
Use case ends.
Use case: UC08 - Delete a Person by Name
MSS
User requests to delete a specific person by name.
NetConnect deletes the person.
Use case ends.
Extensions
1a. There are no persons with the provided name.
1a1. NetConnect shows an error message.
Use case ends.
1b. There are more than one person with the provided name.
- 1b1. NetConnect list the persons with matching name (UC2).
- 1b2. User selects an UID from the list.
- User requests for the list of persons matching a name.
- NetConnect shows a list of persons with matching name.
Use case: UC09 - Tag a Person by UID with Custom Tag
MSS
User requests to tag a specific person by UID with a custom tag.
NetConnect tags the person with given custom tag.
Use case ends.
Extensions
1a. There is no person with the provided UID.
1a1. NetConnect shows an error message.
Use case ends.
Use case: UC10 - Tag a Person by Name with Custom Tag
MSS
User requests to tag a specific person by name with a custom tag.
NetConnect tags the person with given custom tag.
Use case ends.
Extensions
1a. There are no persons with the provided name.
1a1. NetConnect shows an error message.
Use case ends.
1b. There are more than one person with the provided name.
1b1. NetConnect list the persons with matching name (UC2).
1b2. User selects an UID from the list.
Use case resumes at step 2.
Use case: UC11 - Edit Person Information by UID
MSS
User requests to edit the information of a specific person by UID.
NetConnect edit the person information.
Use case ends.
Extensions
1a. There is no person with the provided UID.
1a1. NetConnect shows an error message.
Use case ends.
1b. Some given arguments are invalid.
1b1. NetConnect shows an error message.
Use case ends.
Use case: UC12 - Export Contact List to CSV File
MSS
User requests to export contact list to CSV file with a given filename.
NetConnect creates a CSV file with the contact list data.
Use case ends.
Extensions
1a. The given filename is invalid.
1a1. NetConnect shows an error message.
Use case ends.
1b. The contact list is empty.
1b1. NetConnect shows an error message.
Use case ends.
Use case: UC13 - Relate two contacts together
MSS
- User requests to relate Contact A with Contact B.
- NetConnect adds a relation between the two contacts.
Extensions
1a. The given ID does not exist.
1a1. NetConnect shows an error message.
Use case ends.
1b. The contact list is empty.
1b1. NetConnect shows an error message.
Use case ends.
1c. There is an ambiguous command.
1c1. NetConnect shows an error message requesting to fix ambiguity.
Use case ends.
1c. User relates contact to the same contact.
1c1. NetConnect shows an error message.
Use case ends.
Use case ends.
Use case: UC14 - View all contacts related to a single contact
MSS
- User requests to see all contacts related to Contact A.
- NetConnect shows the list of related contacts.
Extensions
1a. The given ID does not exist.
1a1. NetConnect shows an error message.
Use case ends.
1b. The contact list is empty.
1b1. NetConnect shows an error message.
Use case ends.
Use case ends.
Use case: UC15 - Unrelate two contacts
MSS
- User requests to unrelate Contact A with Contact B.
- NetConnect removes the relation between the two contacts.
Extensions
1a. The given ID does not exist.
1a1. NetConnect shows an error message.
Use case ends.
1b. The contact list is empty.
1b1. NetConnect shows an error message.
Use case ends.
1c. There is an ambiguous command.
1c1. NetConnect shows an error message requesting to fix ambiguity.
Use case ends.
1c. User unrelates contact to the same contact.
1c1. NetConnect shows an error message.
Use case ends.
Use case ends.
Use case: UC16 - Clear all contact list
MSS
User requests to clear all contacts.
NetConnect requests confirmation from user.
User confirms the request.
NetConnect deletes the entire contact list.
Use case ends.
Non-Functional Requirements
- Should work on any mainstream OS as long as it has Java
11or above installed. - Should be able to hold up to 500 persons without a noticeable sluggishness in performance for typical usage.
- A user with above average typing speed for regular English text (i.e. not code, not system admin commands) should be able to accomplish most of the tasks faster using commands than using the mouse.
- All user operations (excluding export to CSV) should complete within 200 milliseconds.
- The codebase should follow a given set of coding style and should be well documented.
- Should provide friendlier syntax and command aliases for advanced users to complete tasks quicker.
- Should display clear error messages for invalid inputs and failed operations, stating the correct command format or inputs required.
Glossary
- Mainstream OS: Windows, Linux, Unix, MacOS
- Persons: Any person in the contact list. Includes all employees, clients and partners.
- State: The page that displays the results from the last command given.
- UID: A unique numerical identifier for any person added in NetConnect.
- CSV file: A plain text file format that uses commas to separate values, and newlines to separate records.
- Alias: A shortcut name/format for commands.
Appendix: Instructions for manual testing
Given below are instructions to test the app manually.
Note: These instructions only provide a starting point for testers to work on; testers are expected to do more exploratory testing.
Launch and shutdown
Initial launch
Download the jar file and copy into an empty folder
Double-click the jar file Expected: Shows the GUI with a set of sample contacts. The window size may not be optimum.
Saving window preferences
Resize the window to an optimum size. Move the window to a different location. Close the window.
Re-launch the app by double-clicking the jar file.
Expected: The most recent window size and location is retained.
Deleting a person
Deleting a person while all persons are being shown
Prerequisites: List all persons using the
listcommand. Multiple persons in the list.Test case:
delete i/1
Expected: Contact with id 1 is deleted from the list. Details of the deleted contact shown in the status message. Timestamp in the status bar is updated.Test case:
delete 1
Expected: No person is deleted. Error details shown in the status message. Status bar remains the same.Other incorrect delete commands to try:
delete,delete i/x,...(where no persons have id x)
Expected: Similar to previous.Guarantees: Person with the specified id will be deleted from NetConnect and removed from the displayed list.
Deleting a person while displayed list is filtered
Prerequisites: Filter displayed list using
findcommand or one of its variants. Partial contact list displayed.Test case:
delete i/x(where x is the id of person displayed in the list)
Expected: Contact with id x is deleted from the list. Details of the deleted contact shown in the status message. Timestamp in the status bar is updated.Test case:
delete i/y(where y is the id of a person not displayed in the list)
Expected: Contact with id x is deleted from NetConnect, and displayed list displays the full list of persons in NetConnect (without the person with id y. Details of the deleted contact shown in the status message. Timestamp in the status bar is updated.Test case:
delete 1
Expected: No person is deleted. Error details shown in the status message. Status bar remains the same.Other incorrect delete commands to try:
delete,delete i/z,...(where no persons have id z)
Expected: Similar to previous.Guarantees: Person with the specified id will be deleted from NetConnect and removed from the displayed list. Full unfiltered list of persons will be displayed (similar to when
listcommand is entered).
Saving data
Dealing with missing/corrupted data files
- {explain how to simulate a missing/corrupted file, and the expected behavior}